|
|
Why do I get the ERR_CONNECTION_REFUSED error
Sometimes when you’re using Google Chrome to browse the internet, you might come across an error message that says “ERR_CONNECTION_REFUSED.” Well, that’s just a fancy way of saying that Chrome tried to visit a webpage, but it couldn’t make a connection. The reason behind this error is usually because your internet connection is acting up. It’s like trying to make a phone call, but you have a bad signal, so the call doesn’t go through. Although the ERR_CONNECTION_REFUSED error is a connection error, it’s not always just about slow internet. There can be other reasons for this error.
Server issues – Sometimes, the website you’re trying to visit might be down or experiencing technical problems on their end. In this case, their server is refusing the connection.
Firewall or antivirus blocking – Your firewall or antivirus software could be too strict and block the connection to the website, thinking it’s a potential threat.
Incorrect URL or DNS issues – If you’ve typed in the wrong web address or there are DNS (Domain Name System) issues, Chrome won’t be able to connect to the correct server.
Internet connection problems – A poor or unstable internet connection can also trigger this error. If your connection is too slow or drops frequently, Chrome may not be able to establish a connection with the website.
Browser extensions – Sometimes, browser extensions can interfere with the connection process, causing the error.
Proxy settings – If you have incorrect proxy server settings configured in Chrome, it can prevent the browser from connecting to the website.
Server port issues – The website you’re trying to access might be using a specific port for connections, and if that port is blocked or misconfigured, it can result in the “ERR_CONNECTION_REFUSED” error.
Outdated browser – Using an outdated version of Google Chrome can also lead to this error. Keeping your browser up-to-date is important for compatibility with websites.
Troubleshooting the ERR_CONNECTION_REFUSED error
Check if the website is down
Sometimes it’s the website’s server acting up, not your internet being a pain. Here’s how to find out: Open another web page. If you see the same error, it could be your internet acting funky. But if the second page loads just fine, then it’s likely the website you were trying to visit that’s having a bad day. Now, if you want to double-check, there’s a free online tool called Down For Everyone Or Just Me. Copy and paste the web address of the page with the err_connection_refused and click Or just me? If it’s down for everyone, well, there’s not much you can do except wait until they sort it out. But if it’s working for others and still not for you, then it’s time to try some other troubleshooting steps.
Reset your router
When you’re facing internet issues, one of the first things you can do is restart your router. It’s a simple yet effective trick.
Here’s how it works:
Find your router, unplug it from the power source, and wait for about 30 seconds. Then, plug it back in. Once your router starts up again, try visiting the website with the error. If it loads, great! You’re all set. If not, there might be another reason behind the problem.
Clear browser cache
Chrome likes to store information on your computer to speed up your browsing – things like your history, login info, and cookies. It’s handy, but sometimes this stored data gets old and doesn’t match the current web pages. That’s when you might see that annoying error. You can check if it’s a cache issue before clearing the cache. Open Chrome in incognito mode or use a different browser. If the error persists, it’s likely a cache issue. Here is how to clear browser cache:
- Click the three dots in the top-right corner of Chrome and choose History.
- On the History page, click on Clear Browsing Data or simply enter chrome://settings/clearBrowserData in your address bar.
Now, once you’re on that page, make sure you tick all the boxes for the different types of files listed. If you leave some unchecked, Chrome won’t completely clear your cache. It’ll only remove the most recent stuff, which might not fix your issue.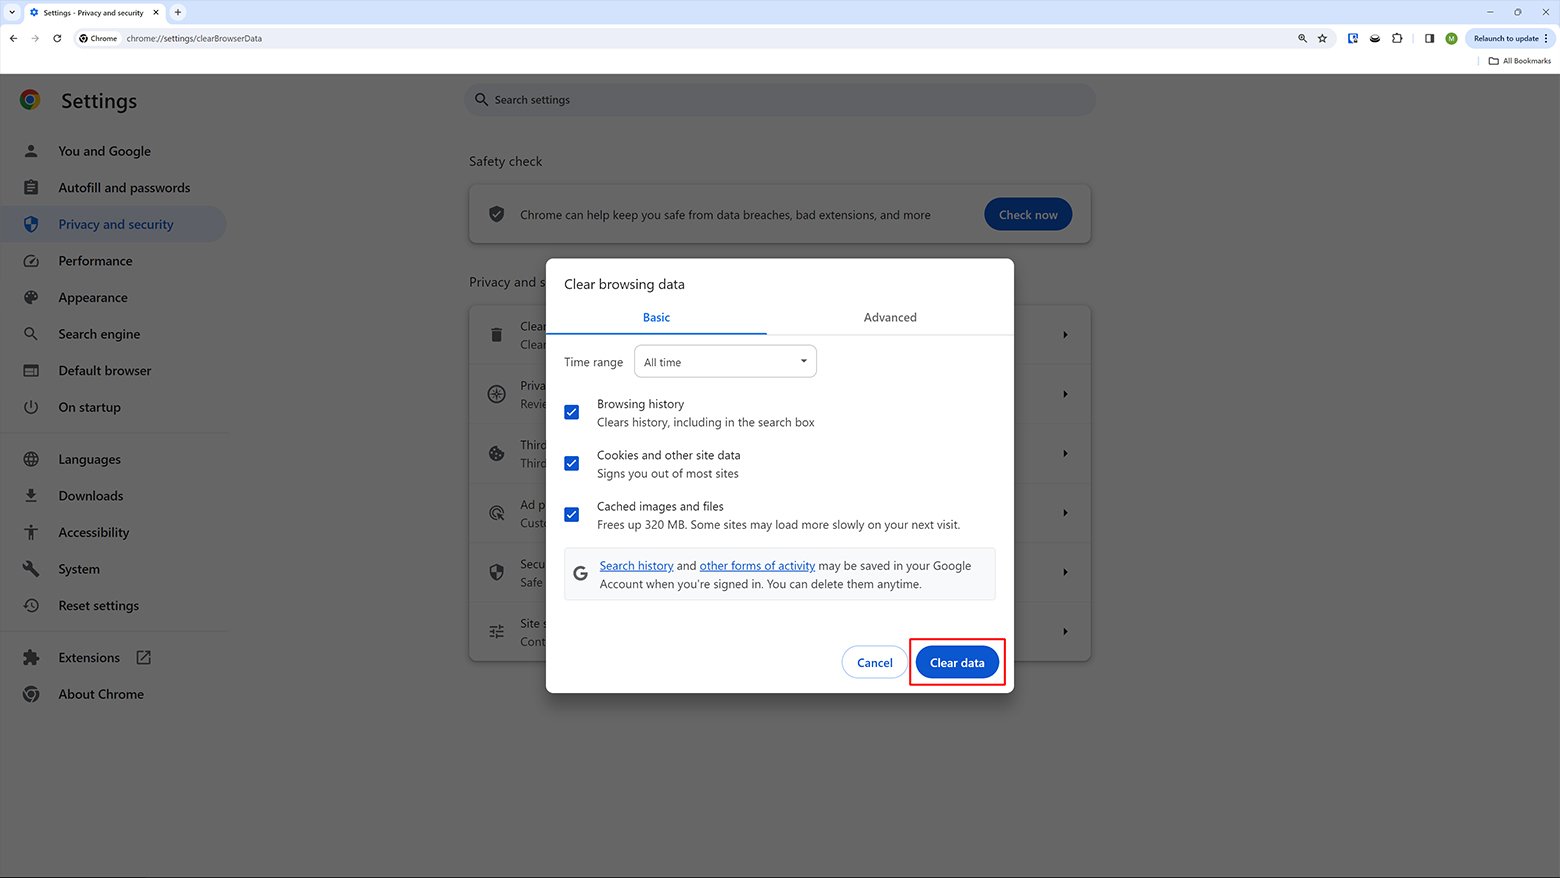 - Lastly, click on Clear browsing data.
This should help get rid of any outdated data causing the issue.
Evaluate and adjust proxy settings
With all the online security concerns these days, many folks use proxy servers to protect their sensitive info. A proxy is like a middleman between your web browser and the websites you visit. It hides your real IP address and can also help with things like storing data and talking to servers. But sometimes, just like with cache, proxy servers can cause the “ERR_CONNECTION_REFUSED” error. For example, a website might reject the IP address coming from a proxy server and say “Nope” to the connection. It could also be that the proxy isn’t working right or isn’t set up correctly. So, if you’re seeing this error, it’s worth taking a look at your proxy settings.
Windows users
- Click on the window key of your computer
- Open the Control Panel
- In the control panel, click to open the Internet Options
- Click on Connections > LAN Settings
- Uncheck the boxes Automatically detect settings and Use proxy server for LAN.
- Click OK
Mac users
- Click on the Apple logo at the top left and choose System Settings.
- Click on Network.
- Select the active network connection you’re using (like Wi-Fi or Ethernet).
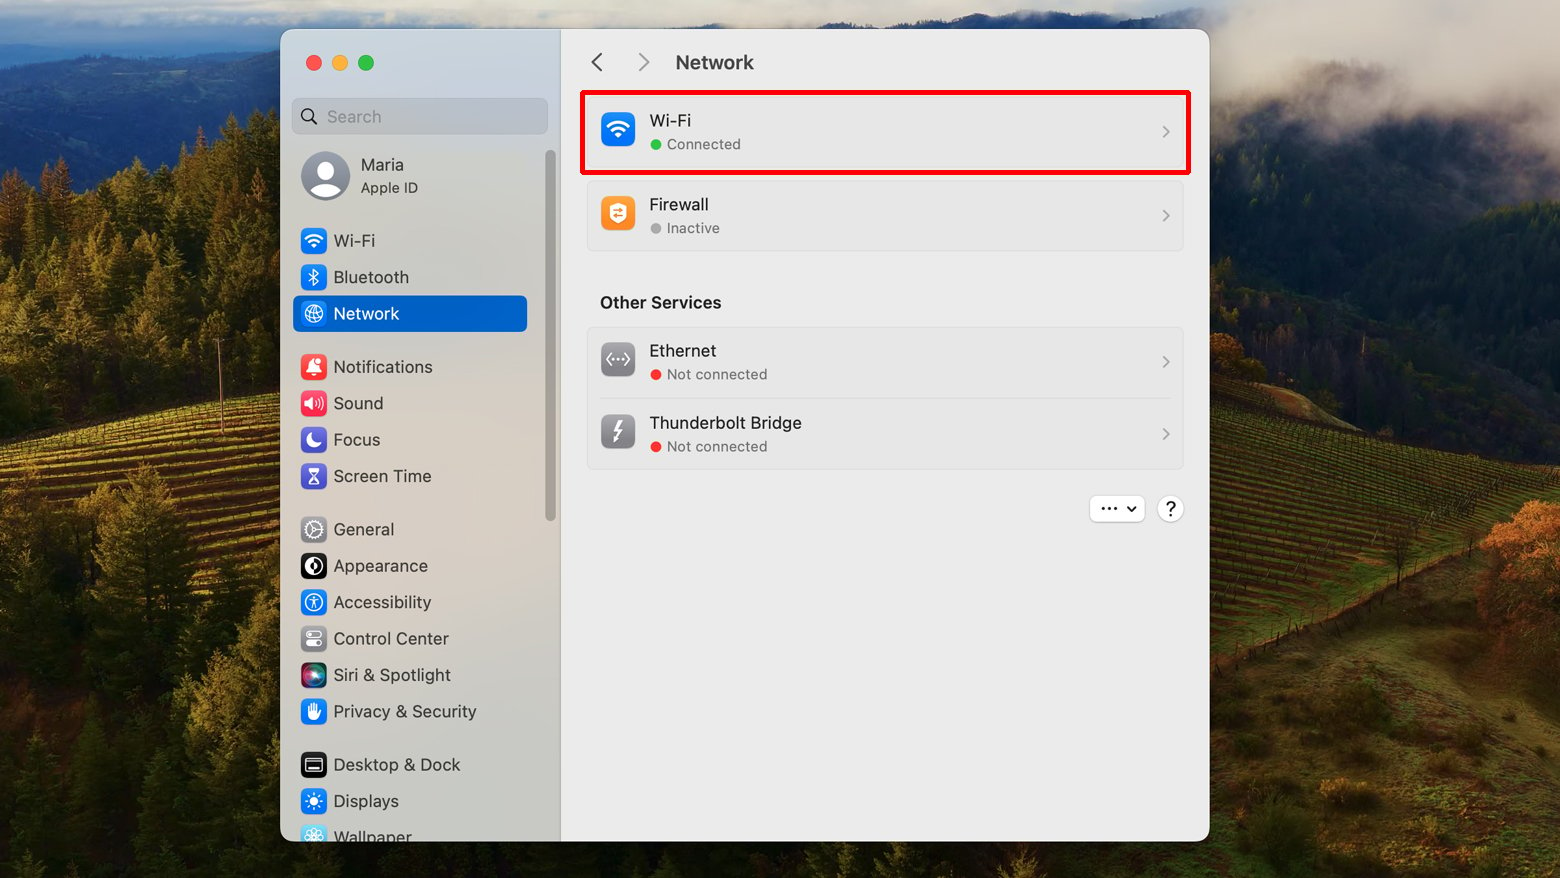 - Once you’ve selected your network, click the Details button.
- In the setting details, go to the Proxies tab.
- Toggle off all the different proxy protocols listed.
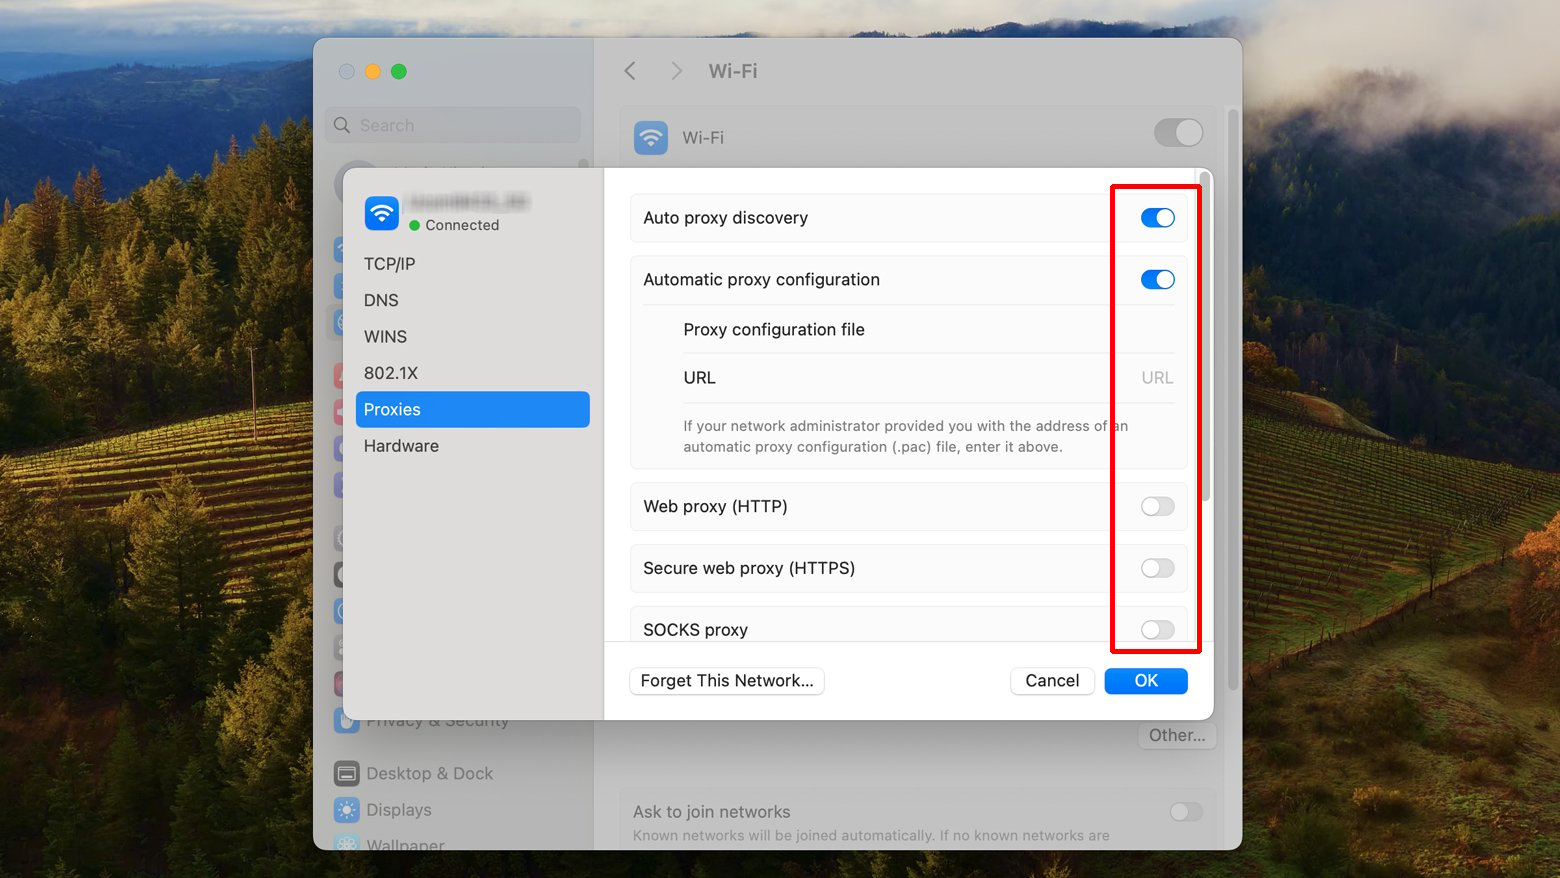 - After you’ve unchecked them all, click OK to save your changes.
When done, check the website to see if the error has resolved.
Temporarily disable your firewall and antivirus
Antivirus and firewall programs are like the guardians of your computer, protecting it from nasty stuff like viruses and malware. They watch over your files and internet traffic, making sure nothing bad sneaks in. Sometimes, they can be a bit overzealous. They might block perfectly safe websites, causing the “ERR_CONNECTION_REFUSED” error. A quick fix could be temporarily turning off your antivirus and firewall. However, only do this if you’re 100% sure the website you’re trying to visit is safe and trustworthy.
Windows users
To temporarily turn off your Antivirus:
- Go to Settings > Privacy & Security.
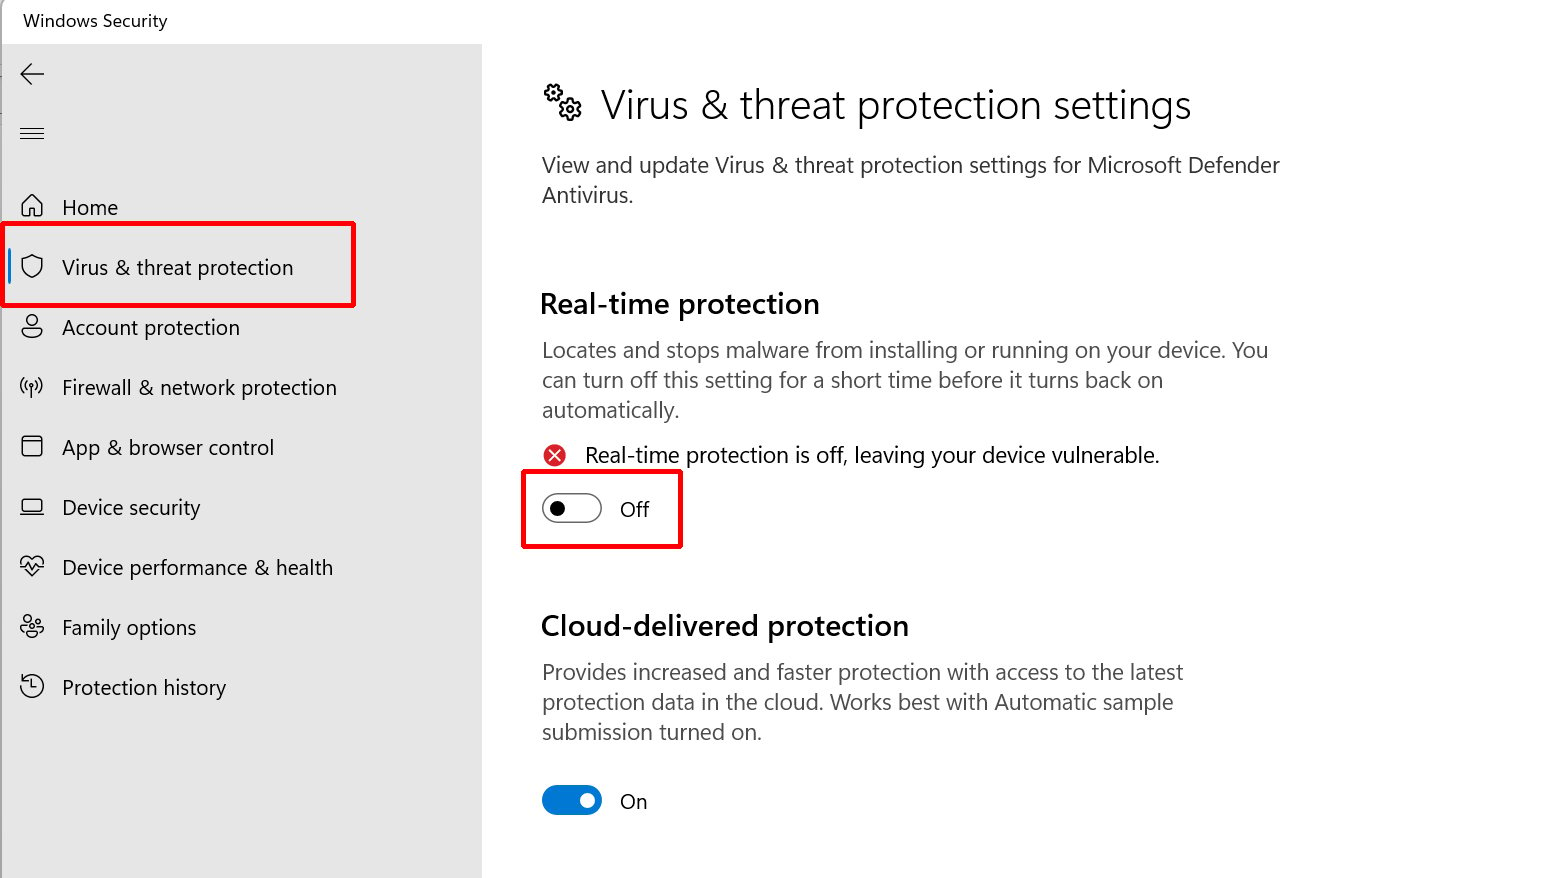
- Click on Virus & Threat Protection.
- Under Virus & Threat Protection Settings, click on Manage Settings.
- Toggle Real-time Protection to off.
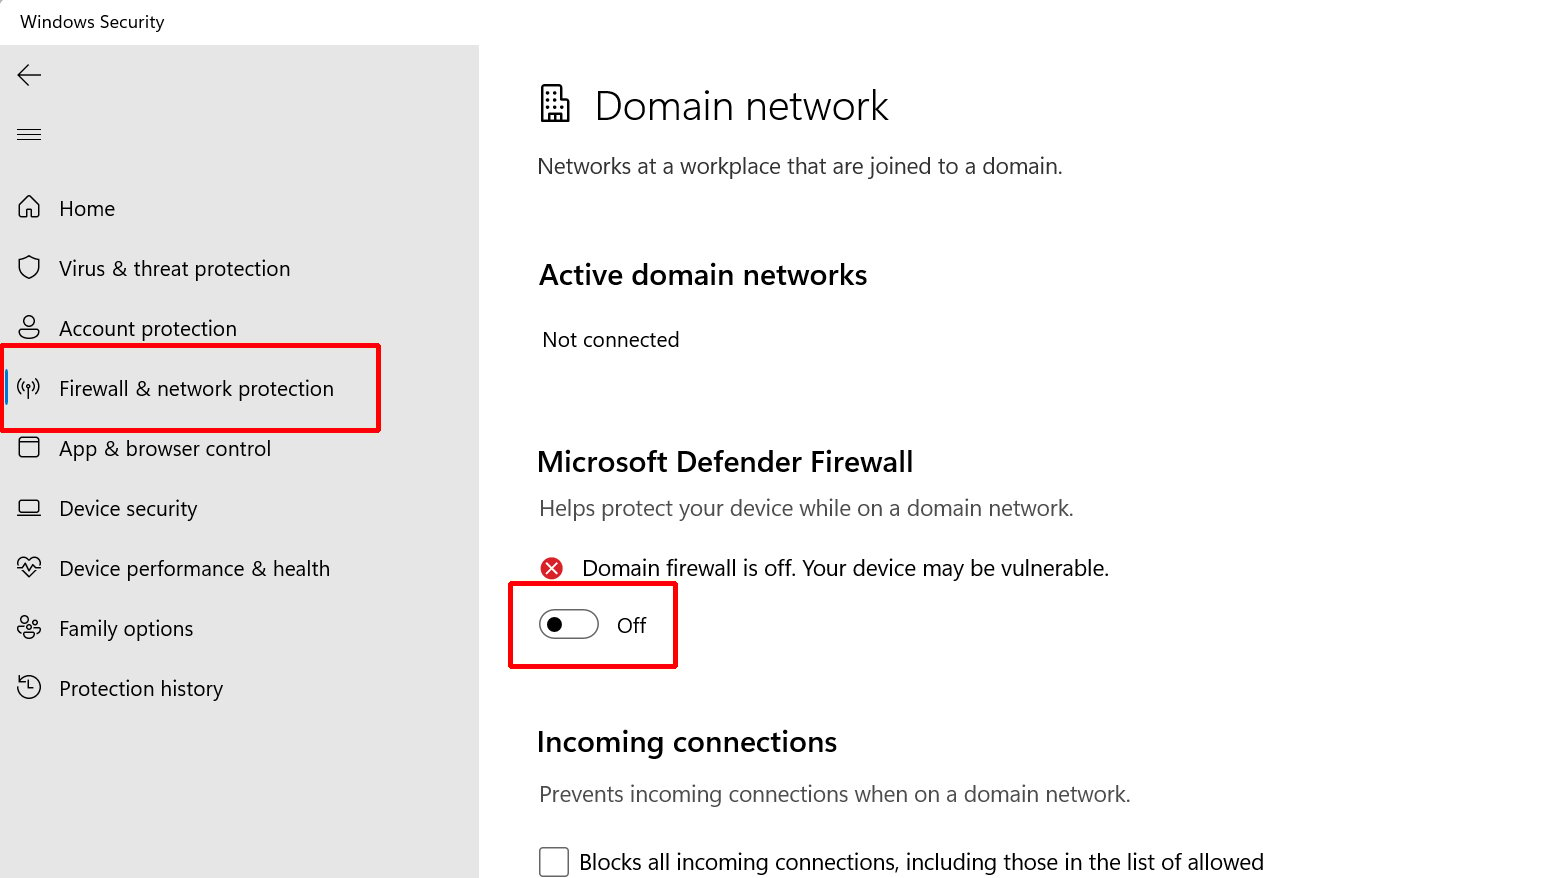
To temporarily turn off your Firewall:
- Go to Settings > Privacy & Security.
- Click on Firewall & Network Protection
- Select each network profile (domain, private, public), and disable Microsoft Defender Firewall.
Mac users
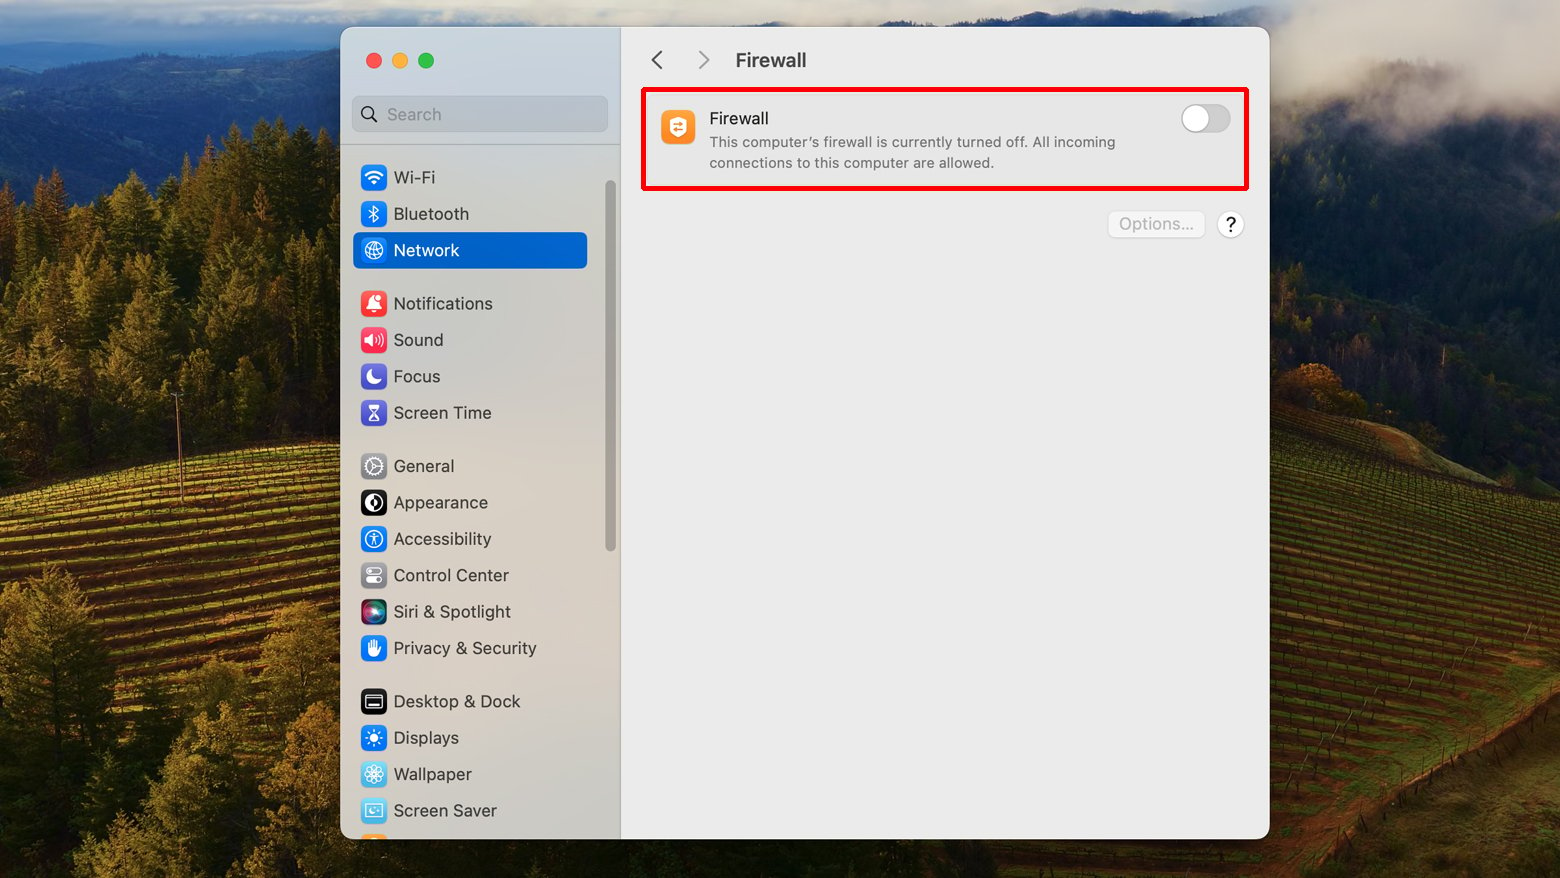
To temporarily turn off your Firewall:
- Click the Apple logo at the top left.
- Choose System Settings > Network.
- Click the Firewall tab
- Unlock it with your password if necessary.
- Turn off the Firewall.
You may be using some other antivirus or firewall software. Keep in mind that the steps will be different. Check their documentation or help guides for the right way to temporarily disable them. It is important that you only do this temporarily and make sure you switch them back on when done.
Disable your VPN
VPNs hide your real location on the internet and make it look like you’re browsing from somewhere else. This helps in keeping your online activity private. However, VPNs can sometimes mess with your connection and cause the ERR_CONNECTION_REFUSED error in Chrome. If that happens, you can try turning off your VPN for a bit to see if it helps. Most VPN services make it easy to turn them on or off. We’ll use NordVPN, as our example: Open the NordVPN app.
- If you’re connected to a server, find the option to disconnect.
- You might have the choice to pause the VPN for a specific time.
Just keep in mind that you’re turning off your privacy shield temporarily when you do this, so make sure to switch it back on when you’re done browsing.
Clear DNS cache
The DNS cache saves important info about the websites and pages you have visited, like their names and addresses. It does this so it doesn’t have to keep asking the same questions about websites all the time. That’s great for speeding up web browsing, but if one of those stored entries doesn’t match the current version of a website, it can lead to the “ERR_CONNECTION_REFUSED” error. Flushing your DNS cache will help.
Windows users
- Press the Windows key to open the start menu.
- Search for cmd, which will bring up the command prompt.
- In the command prompt, type: ipconfig /flushdns and hit Enter.
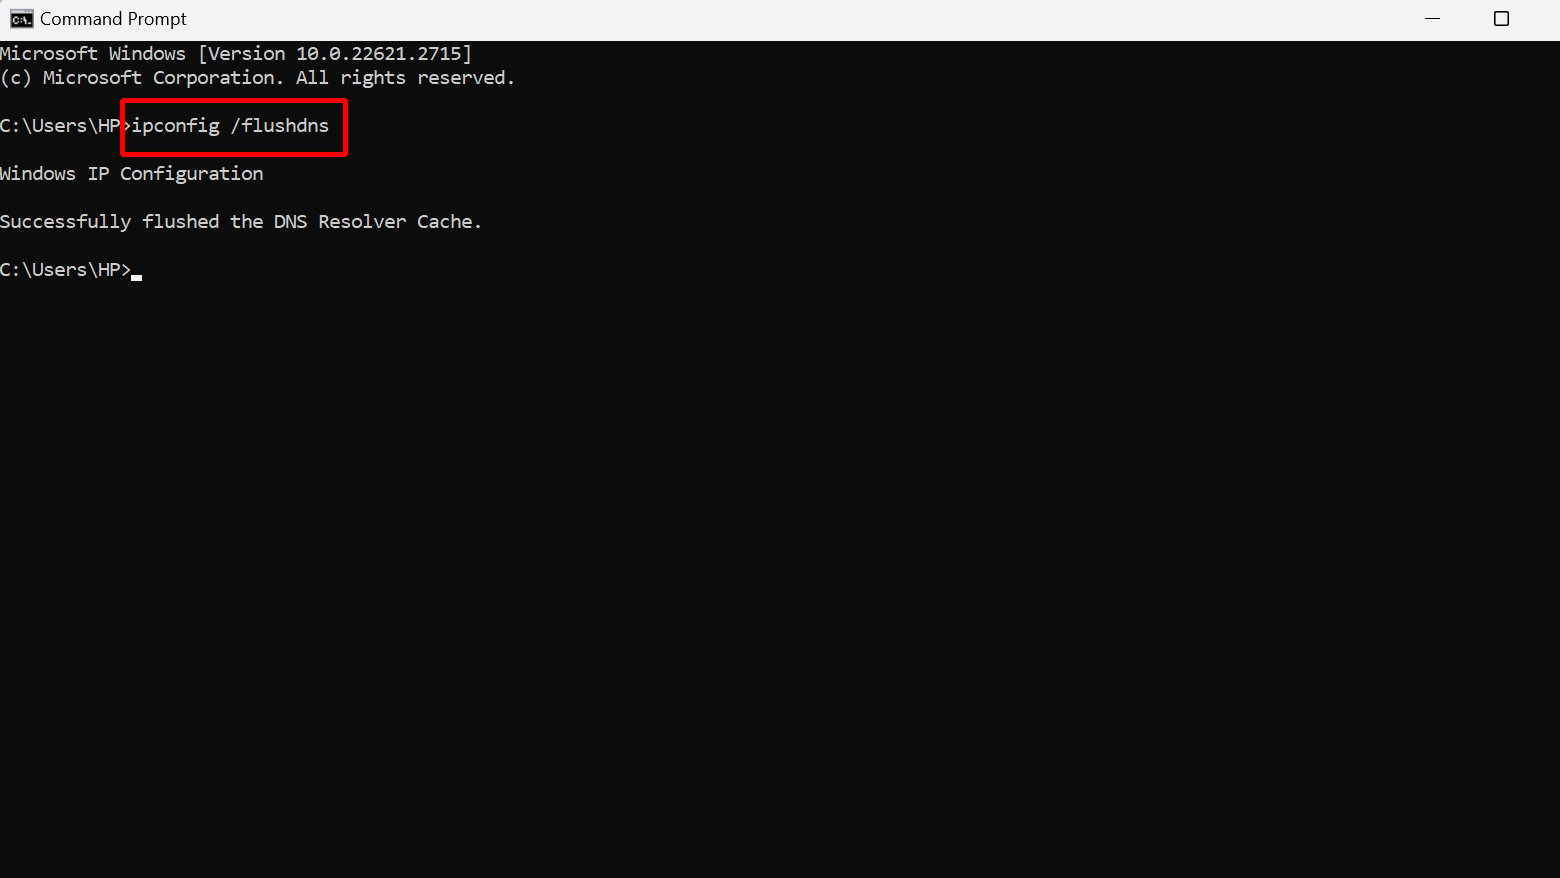
You’ll see a message confirming that it successfully cleared the DNS resolver cache.
Mac users
- Click on Go in the toolbar, then go to Utilities.
- Open the Terminal.
- In the Terminal, type: sudo killall -HUP mDNSResponder && echo macOS DNS Cache Reset and hit Enter.
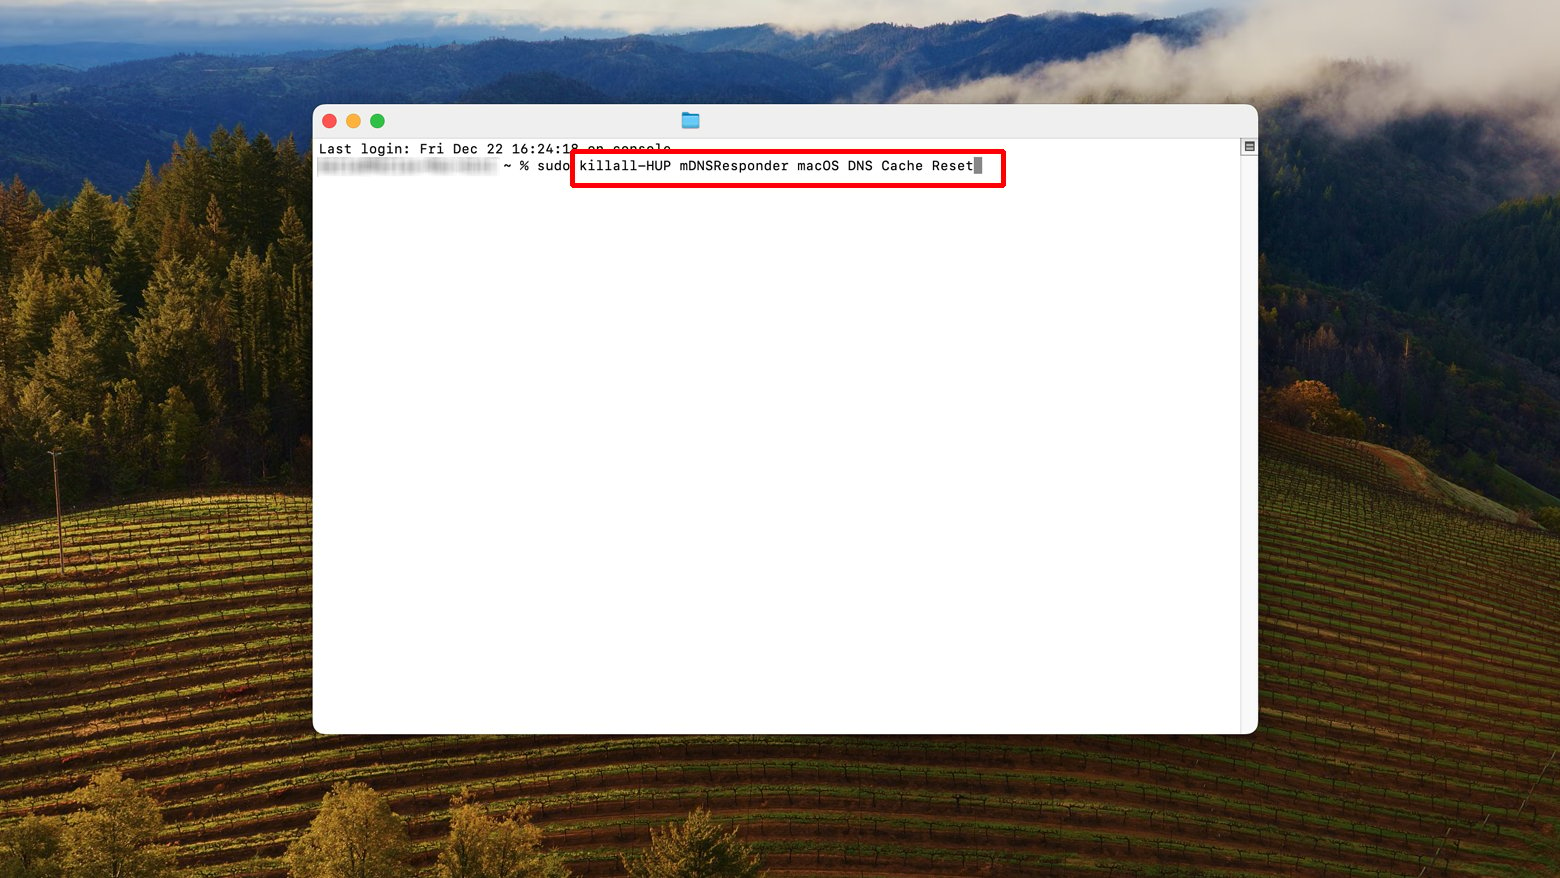 - Enter your admin password when prompted to do so.
When done, try to visit the website that was causing trouble.
Switch your DNS server
By default, your internet provider picks your DNS server. Sometimes these servers malfunction. They can get overloaded or even go offline, causing connection issues. The good news is that you can change your DNS servers. We’ll show you how to switch to alternative DNS servers, like Google’s or Cloudflare’s, to clear the path and get you back online smoothly. Here are some public alternative DNS server addresses you can try:
- Google Public DNS: 8.8.8.8 or 8.8.4.4
- Cloudflare DNS: 1.1.1.1 or 1.0.0.1
- OpenDNS Home: 208.67.222.222 or 208.67.220.220
- AdGuard DNS: 94.140.14.14 or 94.140.15.15
- Quad9: 9.9.9.9 or 149.112.112.112
Now, let’s see how to change your DNS settings.
Windows users
- Go to Start > Settings > Network & Internet.
- Choose the internet connection (like Wi-Fi) you want to update.
- Click on Hardware properties.
- Next to the DNS server assignment, click Edit.
- If it’s set to Automatic, change it to Manual.
- Pick the internet protocol version (IPv4 or IPv6) your ISP requires.
- Enter a DNS server addresses in the Preferred DNS field.
- Make sure encryption is enabled if available.
- Click Save.
Mac users
- Click the Apple logo > System Settings > Network.
- Select the network you want to change DNS for.
- Click Details on the network.
- In the pop up window, open the DNS tab.
- Remove or double click on the existing DNS address to alter it, or
- Click + to add the new DNS server addresses.
- Enter your preferred public DNS address (like Google Public DNS).
- Click OK.
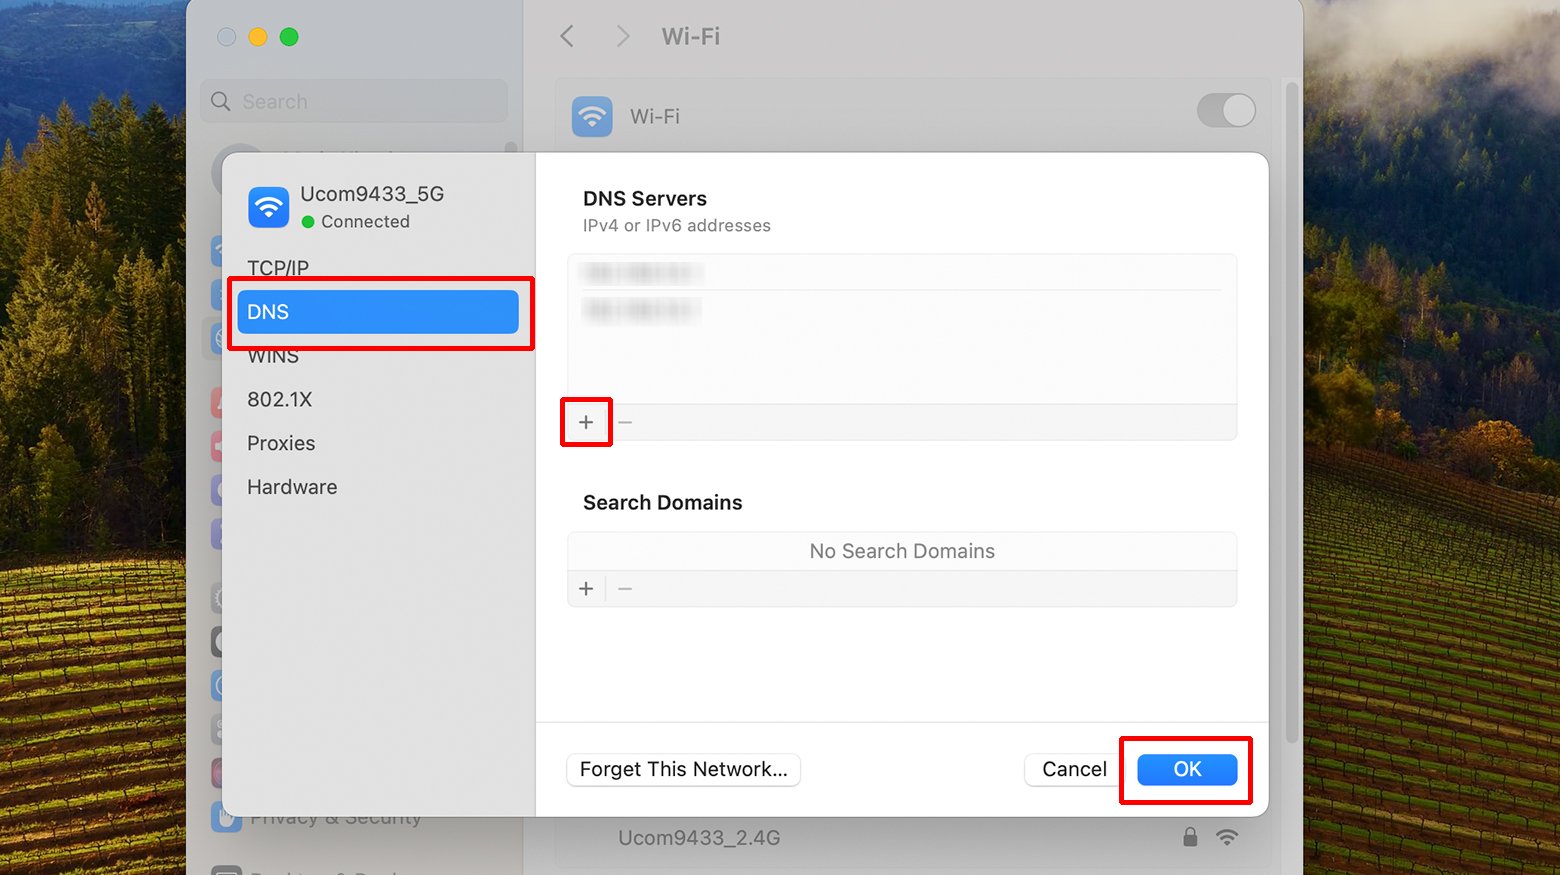
Give it a shot and see if it fixes the problem. If you’re already using a custom DNS server and still having issues, you might want to switch back to your ISP’s DNS to see if that helps.
Turn Google synchronization off
If there are issues with Google synchronization, they may cause the ERR_CONNECTION_REFUSED error. Here’s what to do:
- Click on the three dots menu to the right of the address bar.
- Choose Settings.
- Go to Sync and Google Services.
- Turn it off.
- Check if the error is gone.
And don’t forget to turn it back on after you’re done browsing the site.
Inspect Chrome extensions
Chrome extensions can be pretty handy for adding cool features and making your browsing better. However, lots of these extensions are made by third parties. So, there’s no guarantee they’ll always work perfectly or stay up-to-date. Having the wrong or outdated extensions can lead to the ERR_CONNECTION_REFUSED error. Thus, extensions should be inspected regularly. Here’s what to do:
- Open the Extensions menu in Chrome.
- Take a look at each extension you’ve got. Ask yourself if you really need it. If not, kick it out.
- Check when the extensions you want to keep were last updated. Ideally, they should’ve been updated in the last three months. If not, it’s time to say goodbye.
- Sometimes even new extensions can act up. So, try turning off all your extensions.
- If the website works fine without them, you know one of them is causing trouble.
- To figure out which one, turn them on one by one until you spot the problem.
Keep it clean, and it’ll work better!
Reinstall Chrome
Just like any other software, Chrome isn’t perfect. It can have issues, especially if it hasn’t been updated in a while. Plus, sometimes it doesn’t play nice with your computer’s operating system. When all else fails, the solution might be to give Chrome a fresh start. You can uninstall the current version and get the latest one straight from the official Chrome website. Here’s what to do:
First, a quick fix
- Open Chrome
- Click the three dots
- Go to Settings > Advanced
- Hit Restore settings to their original defaults.
If the error is still there, it’s time for the big move. Reinstall Chrome.
Windows users
- Open Chrome.
- Download the latest Chrome version to your computer.
- Go to Settings > Apps > Installed Apps.
- Find Google Chrome, click the three dots, and uninstall the old version.
- Run the installer to install the newly downloaded version.
That should get Chrome back in tip-top shape.
Closing thoughts
In this blog, we’ve tackled the “ERR_CONNECTION_REFUSED” error in Google Chrome. We covered various troubleshooting steps, from changing your DNS server to managing Chrome extensions and even reinstalling the browser when needed. The goal is to help you navigate these issues with ease and get back to a smooth internet experience. If you encounter this error, don’t worry – you now have the knowledge to troubleshoot it like a pro! |
|